AWS IoT SSH Tunnel: The Ultimate Guide To Secure Remote Access
Hey there tech enthusiasts! If you're diving into the world of AWS IoT SSH Tunnel, you're in the right place. This powerful combo is like the secret weapon for secure communication between devices and servers. Whether you're a developer, system admin, or just someone curious about how IoT works, this guide will unravel the mysteries of AWS IoT SSH Tunnel. Buckle up, because we're about to take a deep dive!
You've probably heard about AWS IoT and SSH tunnels separately, but when you combine the two, it's like mixing peanut butter and jelly—two great things that work even better together. AWS IoT provides a robust platform for managing IoT devices, while SSH tunnels offer a secure way to connect to those devices remotely. The result? A secure, efficient, and scalable solution for remote device management.
Now, let's get one thing straight. AWS IoT SSH Tunnel isn't just a buzzword; it's a practical solution for businesses and individuals who need to access IoT devices from anywhere in the world. This guide will walk you through everything you need to know, from the basics to advanced configurations. So, whether you're a beginner or a pro, there's something here for everyone.
Read also:Eja Lange The Rising Star Redefining Modern Beauty Standards
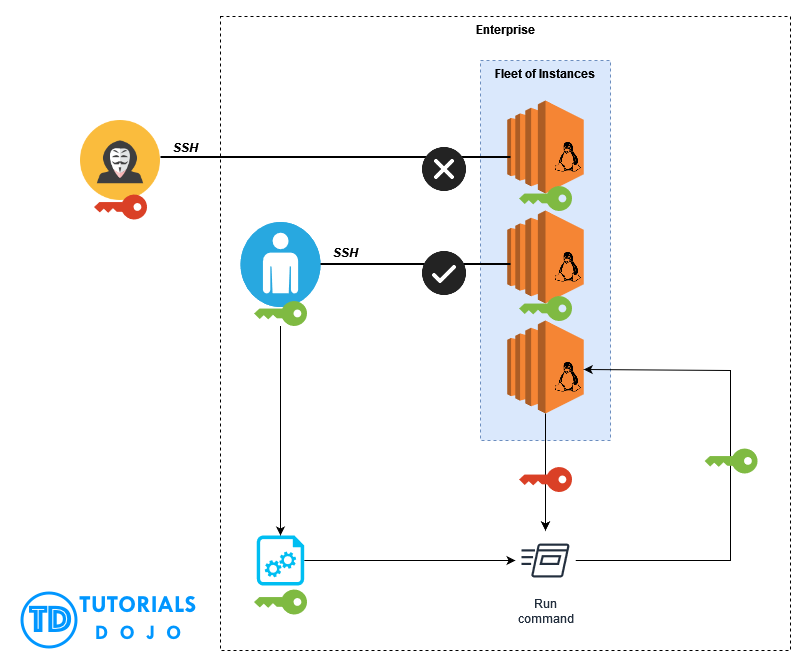
What is AWS IoT SSH Tunnel?
Let's start with the basics. AWS IoT SSH Tunnel is a method of securely connecting to IoT devices using the Secure Shell (SSH) protocol over the AWS IoT platform. It's like building a private tunnel between your local machine and a remote IoT device, ensuring that all communication is encrypted and protected from prying eyes. This is particularly important in today's world, where cybersecurity threats are more common than ever.
Here’s why AWS IoT SSH Tunnel is a game-changer:
- Enhanced security through encrypted connections
- Scalability to manage multiple devices
- Flexibility to connect from anywhere
- Integration with other AWS services for a seamless experience
Think of it like this: imagine you're trying to send a confidential message to a friend. Instead of shouting it across a crowded room, you create a private tunnel where only you and your friend can hear each other. That's what AWS IoT SSH Tunnel does for your IoT devices.
Why Use AWS IoT SSH Tunnel?
Now that we know what AWS IoT SSH Tunnel is, let's talk about why you should use it. In today's interconnected world, security is paramount. With more and more devices connecting to the internet, the risk of unauthorized access and data breaches increases exponentially. AWS IoT SSH Tunnel addresses these concerns by providing a secure and reliable way to manage IoT devices remotely.
Here are a few reasons why AWS IoT SSH Tunnel is worth considering:
- Security: SSH tunnels encrypt all data transmitted between devices, making it nearly impossible for hackers to intercept sensitive information.
- Convenience: With AWS IoT SSH Tunnel, you can access your devices from anywhere in the world, as long as you have an internet connection.
- Cost-Effective: By leveraging AWS services, you can reduce the need for expensive hardware and infrastructure, saving you money in the long run.
- Scalability: AWS IoT is designed to handle thousands, even millions, of devices, making it a perfect solution for large-scale IoT deployments.
So, whether you're managing a small fleet of IoT devices or a massive network, AWS IoT SSH Tunnel has got you covered.
Read also:Summer Baking Championship 2024 Where The Heat Meets The Sweet
Setting Up AWS IoT SSH Tunnel
Setting up AWS IoT SSH Tunnel might sound intimidating, but with the right guidance, it's actually quite straightforward. Here's a step-by-step guide to help you get started:
Step 1: Create an AWS IoT Thing
First things first, you need to create an AWS IoT Thing. Think of this as the digital representation of your physical IoT device. To do this, log in to your AWS Management Console, navigate to the IoT Core service, and click on "Manage"> "Things"> "Create a thing." Give your thing a name, select the appropriate attributes, and create it.
Step 2: Configure Device Security
Security is key, so make sure to configure the necessary permissions and policies for your device. This includes creating certificates and private keys, which will be used to authenticate your device when connecting to the AWS IoT platform. AWS provides detailed instructions on how to do this, so don't worry if it sounds complicated.
Step 3: Set Up the SSH Tunnel
Now comes the fun part—setting up the actual SSH tunnel. You'll need to install an SSH client on your local machine and configure it to connect to your IoT device through the AWS IoT platform. This involves specifying the correct endpoint, port, and authentication credentials. Once everything is set up, you should be able to establish a secure connection to your device.
Pro tip: Make sure to test your connection thoroughly to ensure everything is working as expected. You don't want to find out there's a problem when you're in the middle of a critical operation.
Best Practices for AWS IoT SSH Tunnel
Now that you know how to set up AWS IoT SSH Tunnel, let's talk about some best practices to ensure you're getting the most out of it. These tips will help you optimize performance, improve security, and avoid common pitfalls.
1. Use Strong Authentication
Always use strong authentication mechanisms, such as certificates and private keys, to secure your devices. Avoid using weak passwords or default credentials, as these can easily be compromised by hackers.
2. Regularly Update Firmware
Keep your device firmware up to date to protect against known vulnerabilities. AWS IoT provides tools to help you manage firmware updates across your entire fleet of devices.
3. Monitor Device Activity
Regularly monitor your devices for unusual activity. AWS IoT provides robust monitoring and alerting capabilities, allowing you to quickly identify and respond to potential security threats.
4. Limit Access
Only grant access to trusted users and devices. Use AWS Identity and Access Management (IAM) to control who can access your IoT devices and what actions they can perform.
By following these best practices, you can ensure that your AWS IoT SSH Tunnel setup is as secure and efficient as possible.
Common Challenges and Solutions
Like any technology, AWS IoT SSH Tunnel comes with its own set of challenges. Here are some common issues you might encounter and how to solve them:
- Connection Problems: If you're having trouble establishing a connection, double-check your configuration settings and ensure that all required ports are open.
- Performance Issues: If you notice slow performance, consider optimizing your network settings or upgrading your hardware.
- Security Breaches: In the unlikely event of a security breach, immediately revoke compromised credentials and investigate the source of the breach.
Remember, prevention is always better than cure. By staying proactive and addressing potential issues before they become problems, you can keep your AWS IoT SSH Tunnel running smoothly.
Advanced Configurations
For those of you who want to take things to the next level, here are a few advanced configurations you can try with AWS IoT SSH Tunnel:
1. Multi-Factor Authentication
Enable multi-factor authentication (MFA) to add an extra layer of security to your device connections. This requires users to provide two forms of identification before gaining access, making it much harder for unauthorized users to gain access.
2. Custom Policies
Create custom policies to fine-tune the permissions and actions allowed for each device. This gives you granular control over what each device can do, helping to minimize the risk of accidental or malicious actions.
3. Automated Monitoring
Set up automated monitoring and alerting systems to notify you of any suspicious activity. AWS IoT provides tools to help you automate this process, saving you time and effort in the long run.
These advanced configurations can help you tailor your AWS IoT SSH Tunnel setup to meet your specific needs and requirements.
Future Trends in AWS IoT SSH Tunnel
As technology continues to evolve, so too does AWS IoT SSH Tunnel. Here are a few trends to watch out for in the near future:
- Improved Security: AWS is constantly working to enhance the security features of its IoT platform, including more robust encryption and authentication mechanisms.
- Increased Scalability: With more devices connecting to the internet every day, AWS is investing in technologies to make its IoT platform even more scalable and efficient.
- Enhanced Integration: Expect to see even more seamless integration with other AWS services, making it easier to build and manage complex IoT solutions.
By staying ahead of these trends, you can ensure that your AWS IoT SSH Tunnel setup remains cutting-edge and relevant in the ever-changing world of technology.
Conclusion
And there you have it, folks—a comprehensive guide to AWS IoT SSH Tunnel. From understanding the basics to exploring advanced configurations, this guide has covered everything you need to know to get started with secure remote device management. Remember, security should always be your top priority, so make sure to follow best practices and stay up to date with the latest trends.
So, what are you waiting for? Dive into AWS IoT SSH Tunnel and start securing your IoT devices today. And don't forget to leave a comment or share this article if you found it helpful. Happy tunneling!
Table of Contents
Article Recommendations